Showing posts with label tips. Show all posts

Wednesday, December 18, 2013

Tech Tip of the Day: GMail Image Settings

Google recently incorporated a new security measure for embedded images in the email you receive. Their system automatically caches the image and displays the cached version. This is an added safety feature for GMail users but may still pose limited exposure for spammers and marketers.

This may not eliminate spam all together but it does make it slightly less convenient for spam or marketing firms to gain your info via embedded images.

Because of this new system, Google has made the default setting of Gmail to display all images. This isn't good, but easily remedied.

Simply go to your Settings in Gmail

Then make sure you select "Ask before displaying external images". And while you're at it, enable "Always use HTTPS" in the browser setting. Save your settings.

Friday, April 26, 2013

TED Talks : 10 Tech Time Saving Tips

TED is one of my favorite sites. Here are a few tech tips for everyone. Quite useful, I might actually start making tech-tip videos like this as well...


Thursday, October 4, 2012

App Of The Day - Glympse


"WRU?"

"How do I get there?"

"Am I going the right way?"

"Where are we all meeting?"

Sound familiar? Usual messages we send or receive when meeting up with colleagues, friends, or family (or clingy girlfriends/spouses? hahahaha). But sometimes, it's not very safe or convenient to text or message a location. And some tracking services aren't very good, don't offer a lot of privacy, and worst of all require the creation of an account and everyone you want to give your location to, to sign up as well. So why bother with GPS tracking apps?

Well, there are some very valid reasons to allow certain people to track you. Safety, navigation, travel logs just to name a few. But you don't want to leave this open to the public, nor do you want certain people to track you anytime THEY want. Give them a glimpse of where you are, using Glympse!

This is an app designed to give your GPS location and movement to a specific person (or persons) for a specific amount of time.

In use, it's quite practical for out of town trips, and safety.

I'm part of a car club, and we frequently go on out of town trips. Meet up points are useful but sometimes, others may be late or just choose to follow. What happens if someone doesn't know the way? Sending a Glympse to that person allows the app to create a route to your location. No need to input a destination, just click on the link and a route to that person is calculated automatically.

Alternately, it will allow that person to send you their location, so you can track their movements and verify that they are going in the right direction or are on the right track. "Am I going the right way? Or did I already pass it?"

It's also quite useful for travel safety. Specially in unfamiliar areas, you may want to send a Glympse to a friend or relative so they will know exactly where you are should you need help or if it's critical for people to find you. Like if you're on a long road trip, and your car breaks down or need to be fetched, having sent a link to someone before you head out will make it easier for help to find you.

It's quite an efficient app as well, people you send your location to do not need to have the app, just an email address and web browser. If they have the app, it just allows more options, but isn't critical to receive your location. It doesn't drain your battery much, nor does it chew up that much data so don't worry so much about long trips.


**Disclaimer, this blog does not take ANY responsibility for the impact this app will have on your relationships! Hahahaha! Use at your own risk!**

Wednesday, September 5, 2012

Why Pay For Apps?

There are a ton of free ad-supported apps out there. A lot are quite good and more than adequate for most people's needs. So why bother buying an app? To get rid of those tacky ads? Because it's only $1? To support the development for a good app that you like? Perhaps. But the biggest (and best IMO) reason to buy the ad-free version from a good developer is system performance.

Ad-supported apps need (surprise, surprise) ads to pay their salaries. Those ads need an active internet connection in order to pull in the next ad to display. That takes up internet bandwidth, CPU cycles, and battery life. An article on BBC stated that up to 80% of battery consumed by any particular app is dedicated to the ad-supported functions (receiving the ad, sending anonymous user info back to the system)

Every line of computer code that is run, no matter how small, can use up system speed. Even if a free app uses only 0.5% of your CPU to pull an ad, few people only have ONE app installed. Now, there are those that don't use mobile data and think "Well, that's no biggie to me. I don't use mobile data so I don't see those ads". Why not just shut off your internet connection then? Well, you may not see the ad, but now, the app will continue to poll for new ad content continuously eating up CPU cycles and battery life. The app won't stop requesting for a new ad (or stop trying to send user info) just because you shut off your internet. Even more so, it will try more often until it gets to connect to the system.

Now, are free ad-based apps all bad? Of course not. But when you use an app quite often, it may be worth the $1 (Gasp, you may have to delay buying that latte) to purchase it. It will de-clutter your screen, improve system speed, and help support the developers that actually make good apps!

Tuesday, August 28, 2012

Guard The Cloud! (Dropbox 2-Step Verification)

About a month ago, Dropbox, one of the larger cloud storage companies, confirmed that it was indeed hacked. They've now deployed a 2-Step Verification process before allowing any new devices or sessions to access your account. I highly recommend you activate it ASAP if you use their service!

Simply log into your Dropbox web account online

Go to Settings by clicking on your Account name on the upper right hand side of the website

Click on the Security tab

Then scroll down and enable the Two-Step Verification.

Follow the instructions.

Make sure you have your mobile phone handy since Dropbox will send you a verification code. Or if you have an Android or iOS device, you may use an authenticator app and scan the QR Code instead.

This may be a bit of an inconvenience, but it's much better than having your data compromised.

Monday, August 27, 2012

Have Some Class. (A Memory Card Class Review)


Memory cards are everywhere. Digital cameras, portable music players, video recorders, voice recorders, and mobile phones. Most devices come with free cards when you purchase them. But not all memory cards (or even memory chips for that matter) are made equal.

Why is memory class important? It depends what your device needs the memory for. Most music players can work with the slowest memory cards since mp3 playback doesn't demand high speed transfer. On digital cameras, specially DSLRs, a slower memory card will take longer to save each photo taken, thus giving you longer time before the photo shows up on your view screen. Video cameras, specially HD recorders, require the fastest cards due to their continuous data stream which has to be saved as quickly as possible otherwise you risk dropped frames or worse, not having the clip saved at all.

Memory card speeds are usually printed on the card itself or on the box they came in and are indicative of the respective MINIMUM transfer speeds the card can handle.

(Source Wikipedia)
and so on...

But what about on Android phone? Do they make a real-world difference? Yes they do. Even if your phone doesn't require a fast card, it can usually handle faster data. This in turn has a domino effect on the over-all performance of your phone.

This means faster access to data and apps that are saved on the card. The difference between a Class 2 and Class 6 card can speed up start up time, or allow faster multi-tasking. My Xperia originally came with a basic Class 2 microSD card. The more apps I installed, the slower my phone seemed to become. This is due to the bottleneck created by the card to access the card's content. I upgraded to the Sandisk Mobile Ultra microSDHC card which is a Class 6 and has the added benefits of being waterproof and temperature tolerant (Although a side note, most SD cards are quite durable and can withstand quite a bit of physical abuse already)

Are Class 6 (and higher) cards worth the upgrade? Yes they are. The higher the better, although for everyday tasks, anything above class 6 won't make that much of a difference anymore unless you're doing heavy HD video or audio recording. It's a quick and cheap way to upgrade the overall performance of your Android phone (or any gadget that uses a memory card)

Wednesday, June 6, 2012

Life Begins at 4.0 - Xperia ray Ice Cream Sandwich Update Part 2

Ok, you're now on 4.0 ... now what? What's the big deal? Well, I think it's leaps and bounds better than both Gingerbread (2.3) ... why? Well, a lot of little things. And for me, it's the little things that count.

First thing you will notice is the sleeker interface. A new font (Roboto) is now system-wide and looks very refined. By default, ICS on Xperia has a bluish/teal look to it, just for highlights and stuff. Animations feel smoother and the phone feels faster over-all. Take note, most performance tests will show that the 2011 Xperia phones run slower on ICS, but it doesn't feel that way.

A new lock feature called Face Unlock is added to the Security menu. More of a novelty, it uses your phone's front camera to unlock it. It fails more often than it works, until they develop a better algorithm to process images, it's not really worth using. But it's fun to show off for a few times. The flaw is that any change in lighting or facial angle and it doesn't bother to reprocess and defaults to the secondary unlock mode right away.

For data hogs, there's now a built in Data Usage meter that also alerts you when you're getting close to your limit. You can allow it to cut off your data when your limit is reached to prevent data charges. And a neat feature seems to be that after a few days, it can plot your average use and will give a projection of data usage for the rest of the month as well!

App switching is better too, press and hold the home button for a thumbnail view of recently used apps. You can scroll through recently used (or still running) apps and a small thumbnail of it's previous state is displayed.

Voice Search is more integrated into the core system now, and can no longer be found as a separate app. It's part of the Google Search widget or app already and functions much better. Assuming a stable 3G (or better) connection, the text transcription now happens as you speak with each word appearing right after you speak it instead of after the whole sentence. This is highly network dependent and not a reflection of Google's voice system. On WiFi this performs reliably enough to not really need the keyboard anymore. As always, this can also be enabled in the system keyboard to allow easy access while typing.

Access to system settings is now made easier through the task bar. Simply swipe downwards, as if to access a notification, there you will find a shortcut to the system settings. No big deal, there were apps that could do this, but I prefer having small functions like this built into the core system, rather than having an app for it.

There are also 2 tweaks that you can do that are hidden in the Developer Options Menu, Animations, and Show All ANRs (Apps Not Responding). The Animations menu used to be under Display, and has now been tucked away from regular users. You may set the speed of the animations, or switch them off. I've found that only 1x and off work well. The rest kinda glitch up. The ANR function comes in handy. Usually, when an app hangs, Android shows a pop-up saying that the app is not responding and asks if you want to wait or close it. Show All ANRs does this even for certain background apps that are hidden by default (like Viber). This is quite handy as it functions like a task killer, but only for apps that are hanging. So no need to waste resources with a 3rd party task killer.

ICS task management is also way better, I've rarely had any resource problems that would require me to manually kill tasks. It does this quite efficiently and silently. If you have a lot of background tasks, you may get pop-ups from the ANR feature, but ICS can handle this task quite well even when not enabled. I just prefer to be notified and given the option to close the offending app.

So far, 4.0 is a big leap forward for Android. The system stability, improved interface, and general tweaks on core functions are well worth the slight decrease in performance over Gingerbread (2.3). I've been using it for a month now and have no regrets upgrading.

**Since I upgraded, Sony has already issued a new software version, 4.0.4**

Tuesday, June 5, 2012

Life Begins at 4.0 - Xperia ray Ice Cream Sandwich Update Part 1

A couple of weeks ago, the official Android 4.0 (codename: Ice Cream Sandwich) update for my Xperia ray was released. This was a promise by Sony Ericsson (now Sony Mobile) that all 2011 models (Xperia ray, mini, mini pro, neo, neo v, active, and arc) would all be getting an official ICS update.

How do I update my phone? Don't worry, it's easier than you think. I'm on a Mac, so my screenshots will be showing Sony Bridge for Mac (update your Bridge software, it should already say Sony Bridge, not Sony Ericsson Bridge) For those running Windows, the Companion Software does the same thing, the process is similar, even though the screenshots are different.

First, place your phone in Media Transfer Mode (MTP). You can find this in your phone's SETTINGS Menu under Xperia > Connectivity. Don't worry if you started the update without doing this, your phone will give you the chance to do it later on, this just eliminates the extra step.

Next, plug your phone into your computer using the supplied USB cable. Then start Sony Bridge for Mac (or Sony Mobile PC Companion for PC users)

A pop up screen saying that there is new software available for your phone will appear. Click on Update to start. A webpage will open on Sony Mobile's site stating the new features and other information on upgrading to 4.0, you don't really have to read this and can close it to begin the update.


That's it! Wait for the update to download and install. The whole process should take about 30 min depending on your internet connection.

When the update is done, unplug your phone and turn it on. It will take about a minute for the screen to even come on, this is normal for any major Android software update.


When the screen first turns on, you will see the SONY logo, replacing the Sony Ericsson one on your 2011 phone. Then the boot up. Congratulations! You're now using Android 4.0! In the next entry, a review on the big changes in 4.0

Monday, April 30, 2012

Apple Tip of the Day: FaceTime and Wifi

Here's a small FaceTime fix for those of you that may be having connectivity issues over your home WiFi connections.

If you recently upgraded to a Wireless N capable router (the older ones were B and G) you may have suddenly noticed erratic behavior when making or receiving FaceTime calls.

It's a bit technical, but it has something to do with the "Channel Width" feature found in the newer routers. If you're not comfortable going into your wireless router's menu, then ask someone to help you out.

Now your particular model may not have an identical menu as mine, but try and look under the Wireless settings for something that will show a "Channel" function with 20MHZ/40MHZ as the options. Either disable this, or set it to 20MHZ only.

Another thing, if you no longer have any legacy Wireless B devices (older laptops, etc) then disable the B function on the router all together. This limits the number of conflicts your wireless network will have scanning and searching for older devices.

Original Source: Apple Support Forum

Wednesday, February 29, 2012

iOS Tip Of The Day: Save Your Home...Button.

Almost all iOS owners know the inconvenience of the non-responsive Home Button. It is the weakest link in the iOS hardware platform and yet using it is also the most required action. This leaves you with a perfectly working iOS device...EXCEPT for a Home Button that either doesn't respond or need to be mashed just to respond.

Jailbreaking is an option. It enables gesture (swipe) access to almost all the Home Button functions. But what about people that don't know how, or just don't want to Jailbreak their iOS devices? Well, on iOS 5, Apple has a feature that can help minimize the use of the Home Button.

It's found in the Settings Menu on your device.

Simply scroll down to the General menu

Then go to Accessibility

Then Assistive Touch.

Once enabled, you will now have a translucent button that floats over your desktop. The button placement is dynamic and can be moved around, it will also automatically move out of the way of the virtual keyboard.

Pressing this will bring up a gesture box, and the Home Button is one of them!

Thursday, January 5, 2012

Cover Your Face...Book Timeline (A Privacy Entry)

Facebook has once again changed their interface. Much more drastic than any previous update in the past. Causing the usual uproar about how users preferred the "old interface"... the same one they HATED when Facebook first introduced it.

Anyway, with Facebook's new timeline, user's profile now look more like those Science Museum charts that show important points in history.

For those that want to control their privacy, it's much easier to do so now.

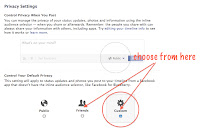
  1. First click on the drop-down arrow on the upper right hand side of your profile page.
  2. Next click on Privacy Settings.
  3. A new page will appear where you can select from 3 options: Public, Friends, and Custom.


  • Public makes everything you post viewable by everyone. Even those not logged into Facebook. For corporate pages, or fansites, this is usually preferred for maximum exposure and search engine indexing.
  • Friends is for just your immediate contacts.
  • Custom is where you can select Friends of Friends, or only a certain group of contacts, or even ban certain Facebook users from viewing your page all together.

Tuesday, January 3, 2012

Tech Gospel v3.0 (New Year.... New Look...)

I've been experimenting with Blogger's new "Dynamic View" templates since they were introduced last year.  But I decided to implement them only in 2012.

There are still a few bugs, and I'm sure a lot of my regular readers may complain... but as all things tech, upgrading is inevitable.  Dynamic View allows for easier search indexing and more interactive layouts.

The advantage of Blogger's new layout is it allows my readers to change my layout to their preferred view.  Go ahead and try it out.  Just click on the drop down menu on the left side and select a new layout!

One limitation for now, however, is that inability to add a header image.  My simple workaround is to have it in my background image.  I'm still going to be playing around with the title bar since the space allowed is quite small.

For those interested in experimenting, the height of your header image should be no more than 65 pixels.  This is the only part of the background image that will be visible above the menu bar. Hopefully, Google will change this soon and allows better customizability.

Here's to 2012 and all the great new technology that will come with it!

Thursday, December 15, 2011

You Can't Have Enough Cloud Storage!

Good news to all Sony Ericsson Xperia users... Sony Ericsson has teamed up with Box to offer all Xperia users 50GB of free cloud storage!  This is a limited offer and Xperia users must sign up before the end of the year to avail of their free space.

Simply download the Box Android app and sign up for a new account from a Sony Ericsson Xperia device.  Although you get 50GB free,  you do not get the advanced features of the paid service.  (It's the 5GB free service + 45GB more space)

Thursday, December 8, 2011

Rainy Friday Traffic App... WAZE


Last time, I wrote about the MMDA's new traffic app.  Comes in quite handy for a general view of traffic in the metro.  But sometimes, green/yellow/red doesn't really give you a full picture.  How slow/fast is traffic actually moving?

For those with data connections on their Android or iPhone, we like tweeting or updating our statuses on our current traffic condition.  It somehow saves our sanity.  But what if there was an app that could that automatically... while helping contribute to the traffic data?

Enter WAZE.  A social-networking app specifically for traffic.  Sign up for a free account and get moving!

The app shows actual Waze users that are on the road, and gives their over-all traffic speed on any given road.  No road for where you are? No problem, it can record your route and now will show your new road on the map! Accident? Flood? Wanna share a traffic mishap with everyone else? It allows that too.

It needs a data connection and GPS to accurately map your location and report traffic conditions in your area, you can specify the radius around you (the smaller the radius the faster the updates) and this is done in real-time. The more people are on it, the more accurate the traffic reporting will be! Try it out!


**This post has been brought to you by Smart LTE**
**No LTE signal here in the Fort, HSPA only**

Monday, November 14, 2011

App of the Day : Online Banking (BPI - Philippines)

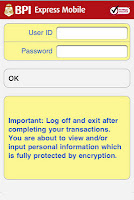
BPI (Bank of the Philippines Islands) has just released their mobile app for both iOS and Android.  It's a very sleek app with all the online banking functions built in.  Although you could just go to your mobile browser to log in and do your banking, zooming in and scrolling around the full page isn't fun, or fast.

The app installation isn't quite clear though... 

The proper procedure is:

1) Log into BPI Online using your login name and password

2) Go to Other Services > Express Mobile Registration > Mobile Banking

3) Enter you mobile number and click Submit (no need to enter the ATM number)


4) You will receive an SMS with a secure link and verification code to activate your account and download the app (If you already installed the app from the App Store or Marketplace, skip the next step)


5) Click the link and download/install the app.

6) Launch the app and enter the verification code you received via SMS

7) Login using your online name and password.

Sunday, October 30, 2011

Thank You! Salamat! Merci Beaucoup! Vielen Dank!


I was very happy when my blog reached it's first 1000 pageviews per month.

I was very happy when it reached it's first 1000 visitors per month.

I'm now happy again to see that number almost double in all aspects since last month! :)

To the 700 new visitors to my blog, and the 200 new regulars...

Salamat!
Thank you!
Merci beaucoup!
Vielen Dank!
बहुत धन्यवाद!
Stort Tack!
Hartelijk dank!

Friday, October 21, 2011

Where Do You Want To Go Today?

Google Maps will help you find the way!

This isn't new to those in the US, but here in the Philippines, GPS Navigation has been restricted to just map and coordinate data.  Google has just recently deployed their Map Directions feature (not yet Google Navigation, but that's coming real soon now that Directions is active) Simply head on over to Google Maps and search for your destination.


Select the appropriate location on map, and click [Direction]


By default, Google Maps will show directions from your current location but you can drag this icon to any starting point and the route recalculates.


The turning points may be dragged to suit your preferred route as well. You may also select an alternate route from a list.


Driving directions will be displayed on the left pane, while the map will show the routes and turning points.


This also works on Android phones!
(BTW, for those geeky enough to know, yes, my title was a Microsoft slogan)

Past Tech Gospels

Related Posts Plugin for WordPress, Blogger...